
More and more tools make OpenCL easier to use. However, most convenience libraries are wrappers for other languages, so C and C++ programmers seem to have the hardest time. For a while now, my favourite option has been Qt Creator with OpenCL. Qt is multi-platform, has a good IDE, is very extensive, has good multi-core and OpenGL support and… it has an extension for OpenCL.
Other multi-platform IDEs are Anjuta, CodeLite, NetBeans and Eclipse. I will discuss them later. Qt gets a head start here because it also simplifies your OpenCL development. It is great for learning OpenCL concepts. Please note, though, that the commercial version of Qt costs at least €2995 a year. Also, the plugin is still in beta.
StreamHPC is not affiliated with Qt.
Getting Qt Creator and the OpenCL plugin
Qt Creator is available in most Linux repositories: install the packages qtcreator and qt4-qmake. For Windows, Mac and other Linux distributions, installers are available on the Qt download page. If you are not familiar with Qt, take a look around the Qt website first.
You can get the source of the QtOpenCL plugin using Git:
git clone https://code.qt.io/{non-gerrit}/qt-labs/opencl.git QtOpenCLSee the project page for its current status.
Building the QtOpenCL plugin
On Linux and Mac you need the build-essential tools. Windows is a lot harder, because you need make, gcc and many other build tools that are not easily packaged for Windows. If you have made a Win32 binary or a Windows-specific how-to, let me know.
Many people have trouble building the plugin. The trick is to pass the options -qmake and -I (capital i) to the configure script:
./configure -qmake <location of qmake 4.6 or higher> -I<location of directory CL with OpenCL-headers>
make
Notice the spaces. Qt provides qmake (package qt4-qmake). The OpenCL headers come with the AMD or NVIDIA SDK (you’ll need the SDK anyway), or from Khronos. For example, on my laptop (NVIDIA, Ubuntu 32-bit, Qt 4.7):
./configure -qmake /usr/bin/qmake-qt4 -I/opt/NVIDIA_GPU_Computing_SDK_3.2/OpenCL/common/inc/
make
On Mac, the header directory is called `OpenCL` instead of `CL`. I haven’t tested whether the plugin takes that into account.
After building, set LD_LIBRARY_PATH to the plugin’s lib directory and run the included example app clinfo. For example, on Linux:
export LD_LIBRARY_PATH=`pwd`/lib:$LD_LIBRARY_PATH
cd util/clinfo/
./clinfo
This shows information about your OpenCL setup. If you need further help, visit the Qt forums.
Configuring Qt Creator for OpenCL
Now it’s time to create a new project with OpenCL support. This takes two steps.
First, create a project and add the following to the .pro file:
LIBS += -L<location of opencl-plugin>/lib -L<location of OpenCL-SDK libraries> -lOpenCL -lQtOpenCL
INCLUDEPATH += <location of opencl-plugin>/lib/
<location of OpenCL-SDK include-files>
<location of opencl-plugin>/src/opencl/
For example:
LIBS += -L/opt/qt-opencl/lib -L/usr/local/cuda/lib -lOpenCL -lQtOpenCL
INCLUDEPATH += /opt/qt-opencl/lib/
/usr/local/cuda/include/
/opt/qt-opencl/src/opencl/
The screenshot below shows how this could look:

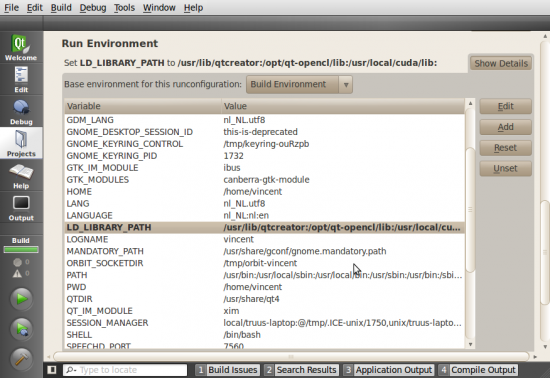
Second, edit (or add) LD_LIBRARY_PATH in the project settings. Click on “Projects”, as shown in the screenshot:
/usr/lib/qtcreator:location of opencl-plugin>:<location of OpenCL-SDK libraries>:For example:
/usr/lib/qtcreator:/opt/qt-opencl/lib:/usr/local/cuda/lib:As you can see, the path now also includes the Qt Creator libraries and the SDK libraries.
The screenshot below shows the edit field for the project environment:
Testing your Qt Creator OpenCL setup
Add some code from the clinfo source to your project:
printf("OpenCL Platforms:\n");
QList<QCLPlatform> platforms = QCLPlatform::platforms();
foreach (QCLPlatform platform, platforms) {
    printf("    Platform ID       : %ld\n", long(platform.platformId()));
    printf("    Profile           : %s\n", platform.profile().toLatin1().constData());
    printf("    Version           : %s\n", platform.version().toLatin1().constData());
    printf("    Name              : %s\n", platform.name().toLatin1().constData());
    printf("    Vendor            : %s\n", platform.vendor().toLatin1().constData());
    printf("    Extension Suffix  : %s\n", platform.extensionSuffix().toLatin1().constData());
    printf("    Extensions        :\n");
    QStringList extns = platform.extensions();
    foreach (QString ext, extns)
        printf("        %s\n", ext.toLatin1().constData());
    printf("\n");
}Something went wrong? Here is where to look:
– Errors while editing (underlined includes, etc.): check INCLUDEPATH in the project file.
– Errors while building: check `LIBS`.
– Errors when running the built application: check LD_LIBRARY_PATH.
Next steps
Admittedly, getting it running is not that easy, but I promise it gets easier from here. Check out our Qt OpenCL Hello World, the included examples and the Qt documentation to start building.

Qt Creator OpenCL Syntax Highlighting
With highlighting for Gedit, I was happy to give y...

Qt Hello World
The earlier blog-post was about how to use Qt Crea...

IWOCL 2017 - all the talks
An overview of all the tutorials and talks for eas...

All the members of the OpenCL working group 2010
(If you're searching for companies who offer OpenC...
Pingback: Tweets die vermelden StreamHPC » Blog Archive » Using QT Creator for OpenCL -- Topsy.com
Hi,
Have been working for Trolltech and I have to say… please it is not QT it is Qt
QT is denoting Quick Time
many thanks